How to Install ADSS Cable

With the development of the information age, optical communication, as a high-speed and stable data transmission method, is increasingly widely used in various fields. ADSS optical cable, as one of the important optical fiber transmission media, has the advantages of safety and efficiency, and is even more handy in installation and maintenance. This article will introduce you to the installation and maintenance of ADSS optical cables to help you better understand its value and advantages
Table of Contents
1. Introduction
2. Make a plan
- What is ADSS cable
- Installation environment inspection
- Safety Considerations
3. Tools and Equipment Needed
4. Installation Process
- Installing Poles and Supports
- Pulling the ADSS Cable
- Securing the Cable
5. Splicing and Termination
- Preparing for Splicing
- Splicing Techniques
- Termination Procedures
6. Testing and Inspection
7. Maintenance and Troubleshooting
8. Conclusion
Introduction
The installation of ADSS optical cables is a key link to ensure the normal operation of optical communication networks. The following are several key points to pay attention to during the installation process:
Make a plan
What is ADSS cable
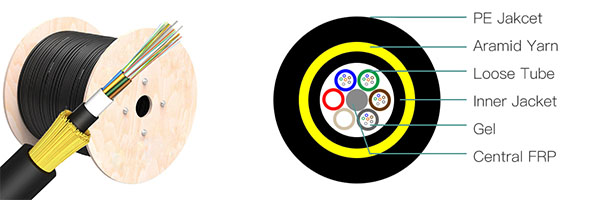
ADSS optical cable, All-dielectric Self-supporting Optical Cable (also known as all-dielectric self-supporting optical cable).
An all-dielectric (metal-free) optical cable is independently hung on the inside of the power conductor along the transmission line (the hanging position is mainly determined by factors such as the electric field strength at the hanging point, the ground distance, the construction and maintenance convenience conditions, and currently most of them are hung under the power conductor) to form an optical fiber communication network on the transmission line. This optical cable is called ADSS.
When the transmission line has been equipped with a ground wire and the remaining life is still quite long, it is necessary to build an optical cable system as soon as possible with low installation costs, while avoiding power outages, etc., the use of ADSS optical cable has great advantages.
Key Characteristics
- All-dielectric Self-supporting
- Lightweight
- Immune to electromagnetic interference
- Designed for long spans
Installation environment inspection
Conducting a thorough installation environment is the first step in any ADSS cable installation project. This involves assessing the installation site to identify if that enviroment is suitable for installation ADSS cable to save time and troubles.
On site investigation steps
1. Draw route : Determine the starting and ending points of installation.
2. Identify obstacles : Pay attention to any trees, buildings, or other structures that may interfere with the installation.
3. Determine span length : Measure the distance between supporting structures.
4. Evaluate pole position : Determine the location where a new pole or bracket needs to be installed.
Safety precautions
In any installation process, safety is of utmost importance. Ensure that all relevant personnel are aware of safety protocols and equipped with necessary personal protective equipment (PPE).
Safety reminder
-Wear appropriate PPE, including helmets, gloves, and safety glasses.
-Use fall protection devices during high-altitude operations.
-Ensure that all devices are in good working condition.
-Comply with all local regulations and guidelines regarding working near power lines.
Required tools and equipment
To effectively install ADSS cables, you will need various tools and equipment. The following is a list of essential items:
-Cable traction equipment: cable pullers, winches, and clamps.
-Tensioning tools : force gauges and tension gauges.
-Connection tools : fusion splicer, cutter, and fiber stripper.
-Supporting hardware : rods, brackets, and fixtures.
-Safety equipment : seat belts, helmets, gloves, and fall protection equipment.
Installation process
Installation rods and brackets
The first step in the physical installation of ADSS cables is to install poles and brackets along the planned route.
1. Mark pole position : Use on-site survey data to mark the exact location of the pole or support structure that needs to be installed.
2. Dig a hole : Dig a hole for the pole to ensure its depth is sufficient to provide stable support.
3. Installation of Electric Pole : Place the electric pole into the hole and fix it with concrete if necessary.
4. Connecting Hardware : Install any necessary brackets, fixtures, or other hardware onto the pole that will support the ADSS cable.
Pull ADSS cable
After installing the poles and brackets in place, the next step is to pull the ADSS cable along the route.
1. Prepare cables : Lay ADSS cables on the ground along the route, ensuring that they are not tangled or twisted.
2. Connect to Pulling Device : Connect the cable to the pulling device to ensure it is securely connected.
3. Start Pulling : Starting from the starting point, pull the cable carefully to avoid damaging it.
4. Monitoring tension : Use a tension meter to monitor the tension on the cable to avoid excessive stretching.
5. Crossing Obstacles : Carefully guide the cable over any obstacles and dispatch additional personnel if necessary.
Fixed cable
After pulling the cable into place, it needs to be fixed to the pole and bracket.
1. Install cable clamp : Regularly install the cable clamp onto the pole to secure the cable in place.
2. Adjust tension : Ensure that the cable is properly tensioned throughout its entire length. Adjust the tension if necessary.
3. Fixed Termination : Use appropriate termination hardware to secure the cable at the endpoint.
Splicing and Termination
Splicing preparation
Splicing is a crucial part of the installation process, especially when cables need to be connected to other cables or equipment.
1. Clean work area: Ensure that the splicing area is clean, free of dust and debris.
2. Prepare cable ends : Peel off the outer sheath and buffer tube to expose the fiber optic cable.
Splicing technology
There are several methods for splicing fiber optic cables, but fusion splicing is the most common method for ADSS cables.
1. Align fiber optic : Use a fiber optic cutter to ensure that the end of the fiber optic is completely flat.
2. Fusion splicing : Use a fusion splicer to weld the optical fibers together, ensuring a secure connection and low loss.
3. Protection splicing : Use splicing protectors to protect the spliced optical fibers from damage.
Termination program
After splicing, it is necessary to correctly terminate the cables to connect to network devices.
1. Install connector : Use epoxy resin or crimping method to connect the fiber optic connector to the end of the cable.
2. Test Connection : Use an Optical Time Domain Reflectometer (OTDR) to test the connections and ensure they are working properly.
3. Fixed termination : Fix the end of the termination in the fiber optic distribution board or housing.
Testing and Inspection
After installation, thorough testing and inspection are crucial to ensure the integrity of the system.
1. Visual inspection : Check the entire cable length for any visible damage or issues.
2. Optical testing : Use OTDR and other optical testing equipment to check for signal loss, reflection, and other issues.
3. Document : Record all test results and any observations for future reference and maintenance.
Maintenance and troubleshooting
Regular maintenance and timely troubleshooting are key to maintaining the normal operation of the ADSS cable system.
Daily maintenance
1. Regular Inspection : Arrange regular inspections to check for physical damage or wear.
2. Cleaning : Keep the connectors and housing clean to ensure good signal quality.
3. Tension adjustment : Check and adjust the cable tension as needed to prevent sagging or excessive strain.
roubleshooting common issues
1. Signal loss : If the signal loss is severe, please check if the fiber optic is broken or bent.
2. Connector issue : If there is a connection issue, please check and clean the connector.
3. Physical damage : Replace any damaged parts of the cable in a timely manner to avoid further problems.
Conclusion
Installing ADSS cables requires careful planning, precise execution, and thorough testing. By following the steps outlined in this guide, you can ensure successful installation and provide reliable fiber optic communication. Proper preparation, use of correct tools and techniques, and maintaining safety standards are crucial for the success of ADSS cable installation projects. Through regular maintenance and timely troubleshooting, your ADSS cable system will be effective in the coming years.
